> For the complete documentation index, see [llms.txt](https://help.littledata.io/llms.txt). Markdown versions of documentation pages are available by appending `.md` to page URLs; this page is available as [Markdown](https://help.littledata.io/google-analytics/setup/ga4-onboarding-admin-settings.md).
# 12 things every GA4 admin should do
A checklist of GA4 admin settings, custom dimensions, audiences and reports to set up after you install Littledata.
After you install Littledata, a few GA4 settings make a big difference to your data quality. This checklist walks you through them, from day one to your second week.
{% hint style="info" %}
Most of these steps help any ecommerce GA4 property, even without Littledata installed.
{% endhint %}
The actions are split into three stages:
* **Day 1:** make sure your setup is right.
* **Week 1:** 2 to 7 days after you install. GA4 can take 24 to 48 hours to show new data in reports.
* **Week 2:** 10 to 20 days after you install, depending on how much traffic your store gets.
### Day 1
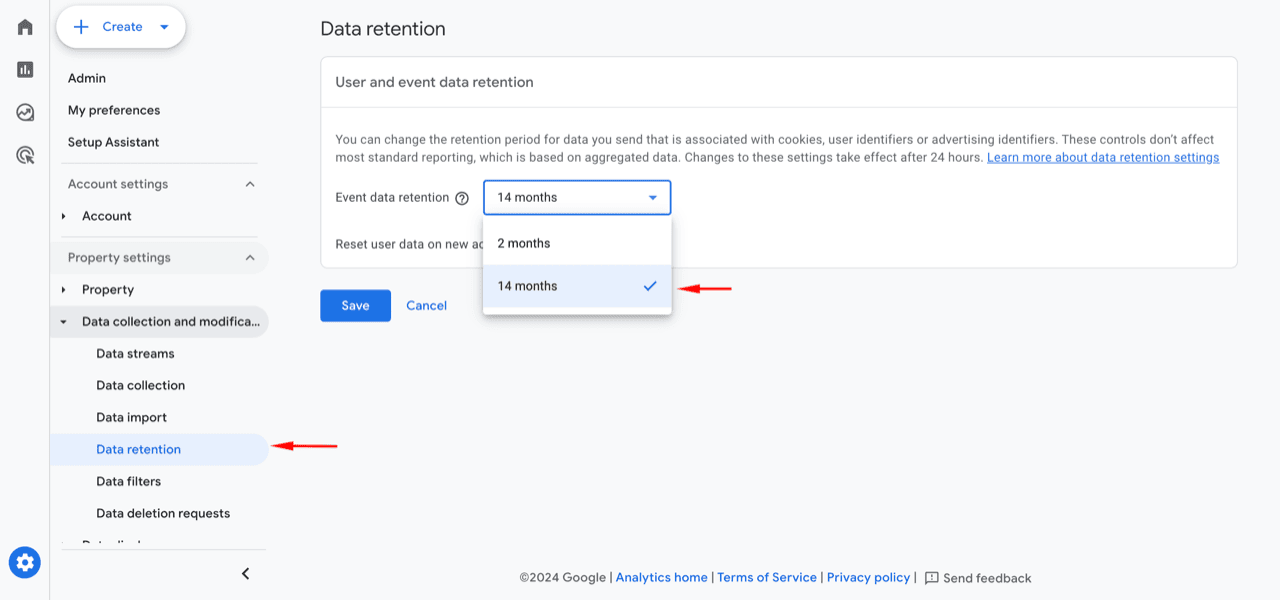
#### 1. Extend data retention to 14 months
By default, GA4 deletes detailed visit data after 2 months. That limits what you can analyze in explorations. Change it to the maximum as soon as you can.
{% stepper %}
{% step %}
**Open Data retention**
In GA4, go to **Admin** > **Data collection and modification** > **Data retention**.
{% endstep %}
{% step %}
**Change the retention period**
Set **Event data retention** to **14 months**, then click **Save**.
{% endstep %}
{% endstepper %}
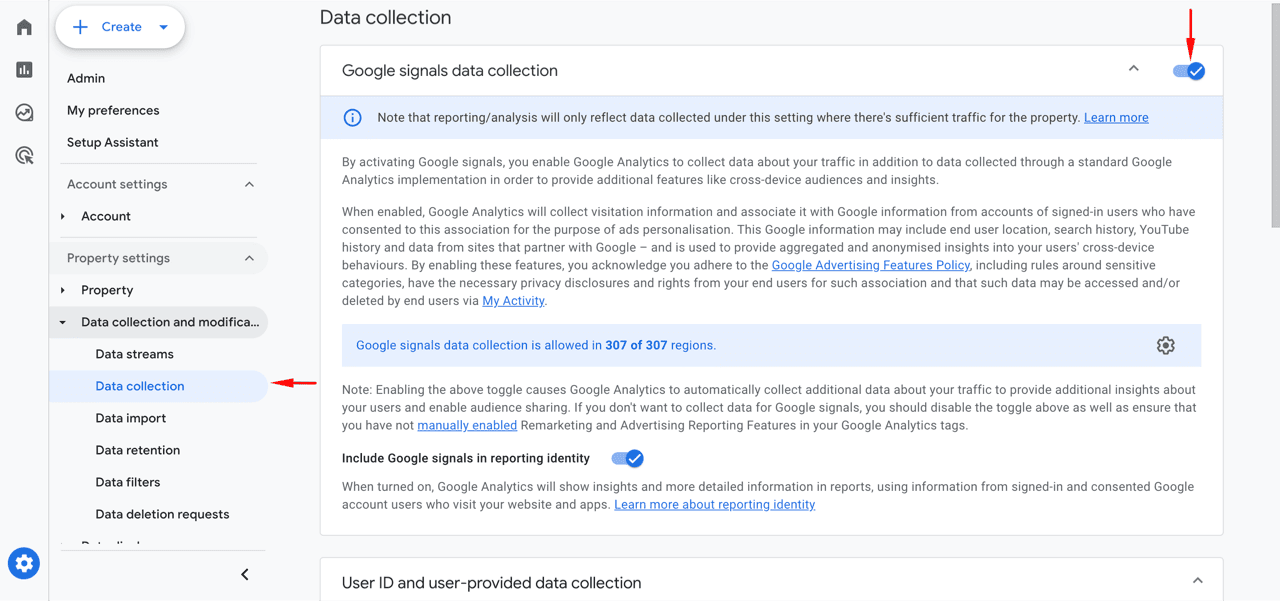
#### 2. Turn on Google signals
When Google signals is on, GA4 collects data from signed-in Google users who agreed to ads personalization.
You need this for your GA4 remarketing audiences to flow into linked Google Ads accounts.
The downside is thresholding. GA4 may hide rows with low numbers in reports to protect user privacy. There are [ways to work around this](https://www.youtube.com/watch?v=-sEGMyP3V1s).
{% stepper %}
{% step %}
**Open Data collection**
In GA4, go to **Admin** > **Data collection and modification** > **Data collection**.
{% endstep %}
{% step %}
**Turn on Google signals**
Turn on **Google signals data collection**.
{% endstep %}
{% endstepper %}
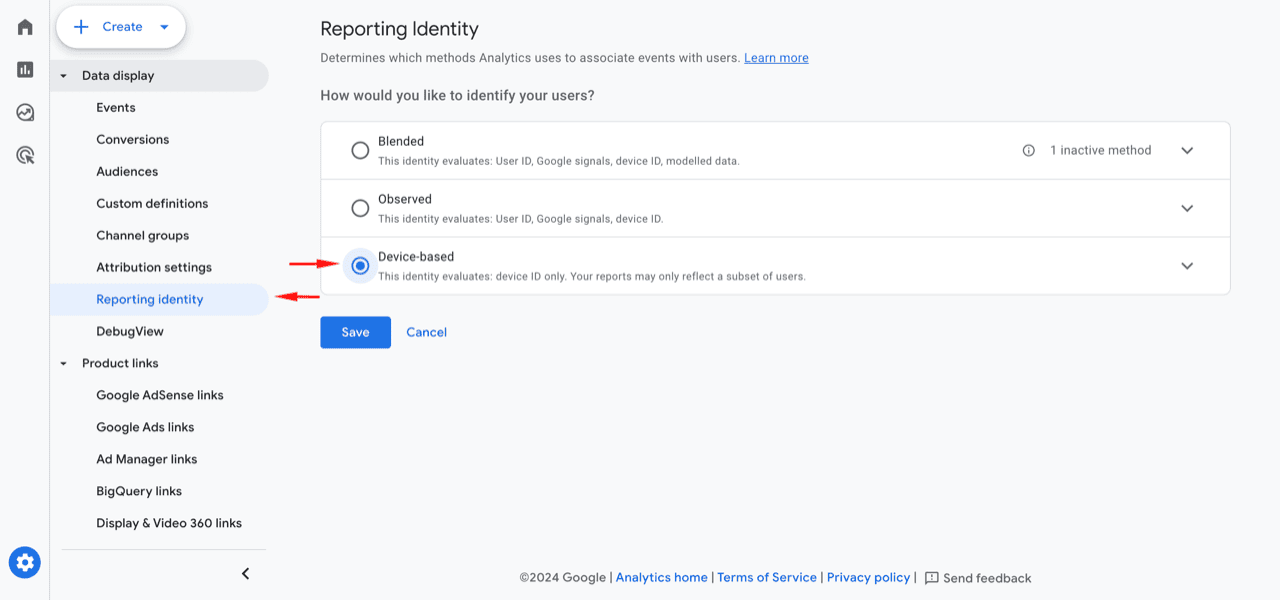
#### 3. Switch the reporting identity to device-based
In theory, device-based is the least detailed reporting identity. In practice, it often gives more accurate attribution, with less Direct and Unassigned traffic.
{% hint style="info" %}
Reporting identity only changes how reports look, not the data itself. The change shows up right away and you can undo it at any time. If your attribution looks worse, switch back to **Blended**.
{% endhint %}
{% stepper %}
{% step %}
**Open Reporting identity**
In GA4, go to **Admin** > **Data display** > **Reporting identity**.
{% endstep %}
{% step %}
**Select Device-based**
Select **Device-based**, then click **Save**.
{% endstep %}
{% endstepper %}
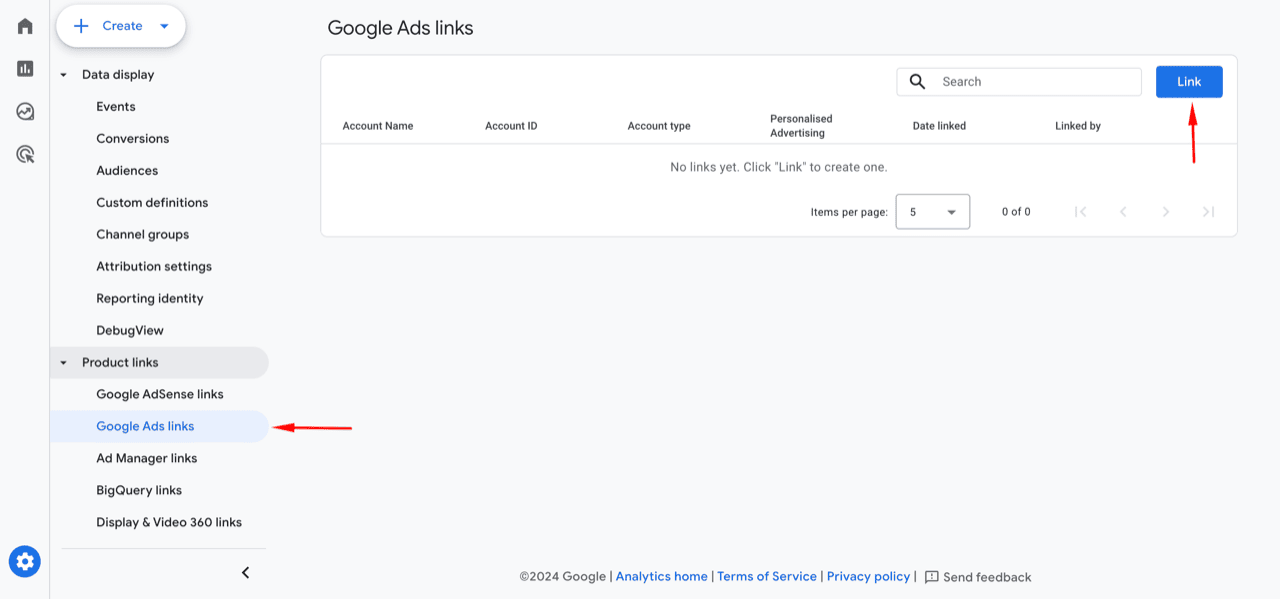
#### 4. Link your Google Ads accounts
Linking Google Ads to GA4 brings ad data into GA4, like campaign names, ad groups, keywords and cost. Without it, you can't build useful reports on google / cpc traffic.
Once linked, you can:
* Compare conversion numbers in GA4 and Google Ads, and troubleshoot differences.
* Get more accurate ROAS.
* Share GA4 audiences with Google Ads for remarketing. This needs Google signals turned on (see step 2).
{% stepper %}
{% step %}
**Open Google Ads links**
In GA4, go to **Admin** > **Product links** > **Google Ads links**.
{% endstep %}
{% step %}
**Add the link**
Click **Link** and follow the steps to choose your Google Ads account.
{% endstep %}
{% endstepper %}
Step 10 shows you how to build a Google Ads report.
### Week 1
#### 5. Get to know Littledata's custom dimensions
On top of the standard GA4 ecommerce parameters, Littledata sends extra custom data with your events. For the full list, see [what Littledata tracks](https://help.littledata.io/advanced/developer/what-does-littledata-track).
Littledata [registers these as custom dimensions](https://help.littledata.io/google-analytics/conversions/customer-lifetime-value-google-analytics) in your GA4 property when you connect GA4. You can see them in GA4 under **Admin** > **Data display** > **Custom definitions**.
| Dimension name | Scope | Parameter |
| --------------------- | ----- | -------------------------- |
| Shopify Customer ID | User | `shopify_customer_id_ld` |
| Lifetime Revenue | User | `lifetime_revenue_ld` |
| Purchase Count | User | `purchase_count_ld` |
| Last Transaction Date | User | `last_transaction_date_ld` |
| Payment Gateway | User | `payment_gateway_ld` |
| Affiliation | Event | `affiliation` |
| App Name | Event | `app_name` |
{% hint style="info" %}
If any of these are missing from **Custom definitions**, you can create them by hand with the dimension name, scope and parameter shown above. See [create the Affiliation custom dimension in GA4](https://help.littledata.io/integrations/shopify-to-google-analytics/create-affiliation-custom-dimension-ga4) for an example.
{% endhint %}
The `affiliation` parameter is especially useful. It adds the order's Shopify tags to each purchase, plus labels for some order types. For example:
* Subscription Recurring Order
* Amazon Marketplace
* Draft (added for draft orders)
* Shop App (added for Shop app orders)
Littledata tracks all purchases on your store, so you need a way to separate draft orders, recurring orders and others. That way, you can attribute revenue properly. For example, leaving out recurring order revenue gives subscription brands a clearer ROAS.
The **Purchase Count** dimension also gives you lots of [audience ideas](https://help.littledata.io/integrations/google-ads/build-winback-campaigns-in-googleads).
#### 6. Add your GA4 measurement ID to all subdomains
If you use non-Shopify landing pages in your ad funnel, they're probably on a different subdomain. Install GA4 on all of your subdomains. In most cases, a basic GA4 setup through Google Tag Manager is enough.
This keeps GA4 attribution for the channels that really drove conversions on your main website.
### Week 2
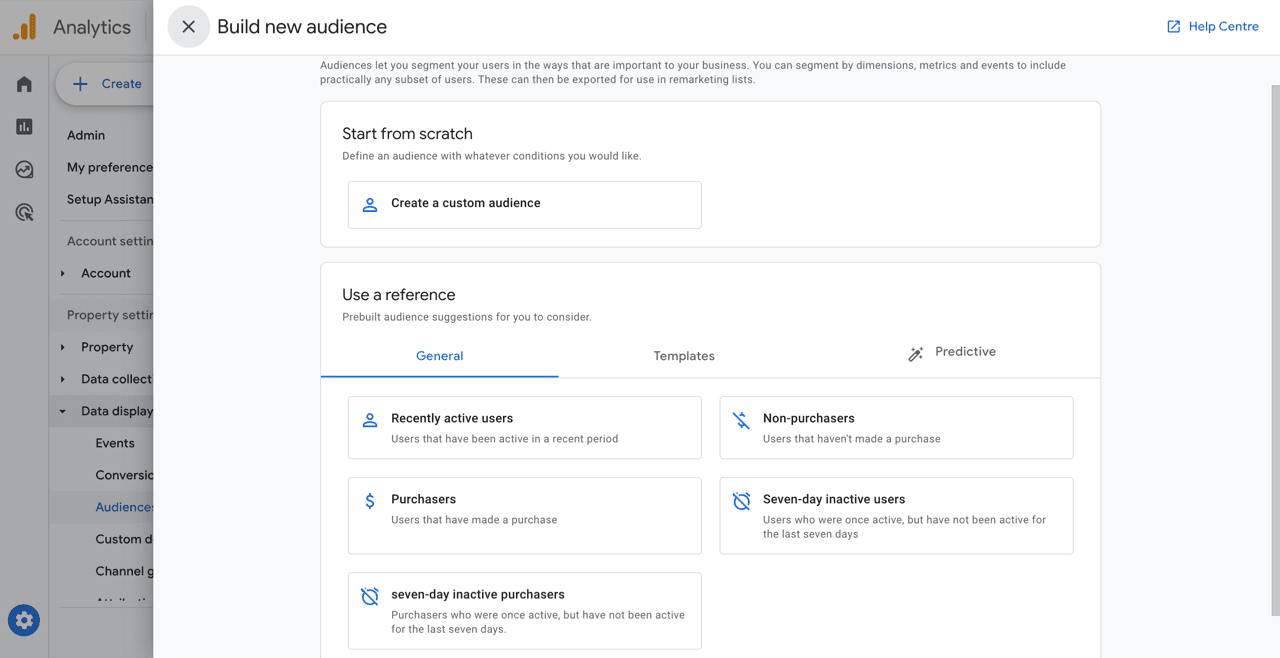
#### 7. Create audiences
Create GA4 audiences based on [Littledata's custom dimensions](https://help.littledata.io/google-analytics/conversions/customer-lifetime-value-google-analytics), like Lifetime Revenue, Purchase Count or Last Transaction Date.
{% stepper %}
{% step %}
**Open Audiences**
In GA4, go to **Admin** > **Data display** > **Audiences**, then click **New audience**.
You can start from scratch or from one of GA4's templates. Try a few options to see what suits your business.
{% endstep %}
{% step %}
**Add a condition**
Pick the dimension you want and a condition. GA4 treats these as text dimensions, so the audience builder only offers text conditions such as **exactly matches**, **begins with** or **matches regex**. For example:
* **Purchase Count** exactly matches `1` finds one-time buyers.
* **Lifetime Revenue** matches regex `^[0-9]{4,}` finds customers who have spent 1,000 or more.
{% endstep %}
{% step %}
**Save the audience**
Give the audience a name and click **Save**.
{% endstep %}
{% endstepper %}
{% hint style="warning" %}
The summary on the right estimates the audience size, but your audience starts empty. It can take up to 72 hours to fill, and it doesn't include past users.
{% endhint %}
#### 8. Create a custom channel group
GA4's default channel group often puts real source / medium combinations into Unassigned. For example, `fbig / pay_soc` clearly means paid Meta traffic, but GA4 won't recognize it.
Go through your session source / medium report and check for custom combinations like this. Then [create a custom channel group](https://help.littledata.io/advanced/troubleshooting/how-to-fix-other-channel-in-google-analytics) to sort them into the right channels.
#### 9. Create a custom report: first user source / medium
Here's how to customize a standard GA4 report and add it to the left-hand menu for everyone on your property. This example builds a first user source / medium report.
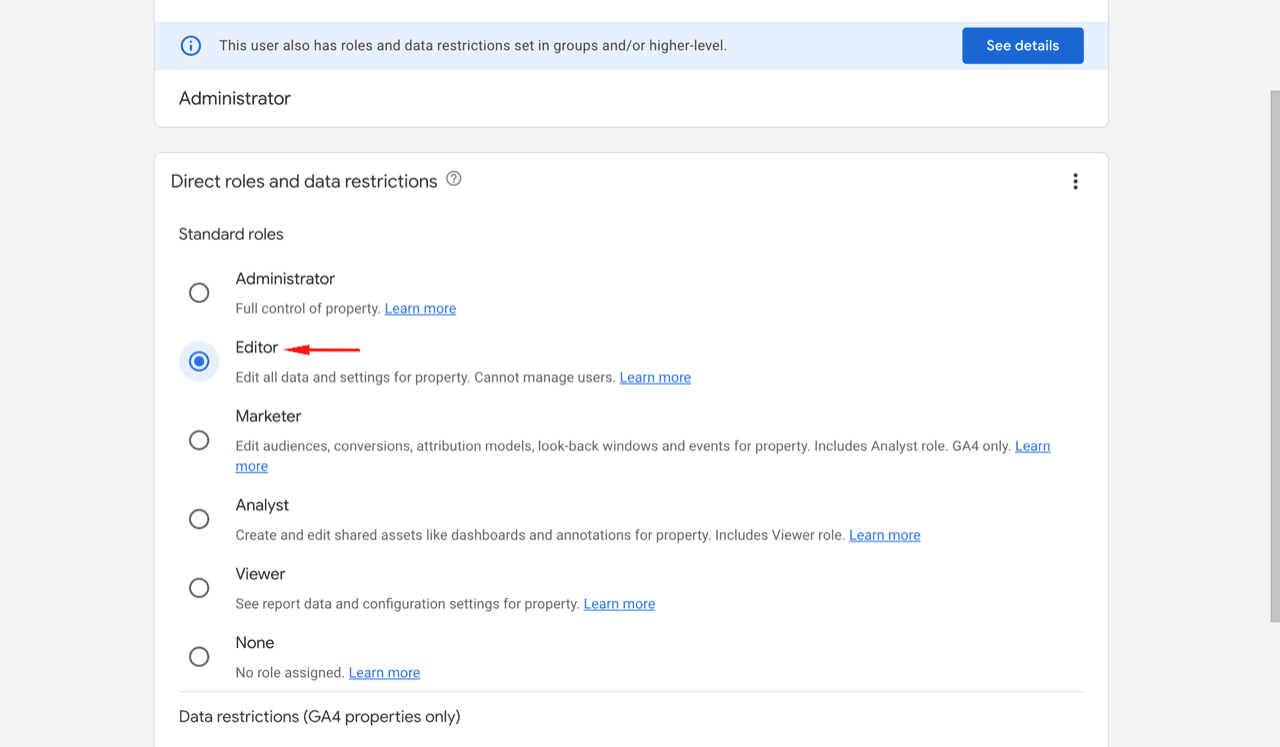
You need **Editor** access or higher on the GA4 property.
{% stepper %}
{% step %}
**Open the report**
In GA4, go to **Reports** > **Life cycle** > **Acquisition** > **User acquisition**.
{% endstep %}
{% step %}
**Customize the report**
Click the pencil icon (**Customize report**) in the top-right corner. If you don't see it, you don't have Editor access.
{% endstep %}
{% step %}
**Set the default dimension**
Click **Dimensions**. Find **First user source / medium**, click the three dots next to it, and select **Set as default**. Click **Apply**.
{% endstep %}
{% step %}
**Save as a new report**
Click **Save** > **Save as a new report**. Give it a clear name, like "1st user source / medium".
{% endstep %}
{% step %}
**Add it to a collection**
Click the back arrow. In **Reports**, click **Library** at the bottom of the menu. Click **Edit collection** on an existing collection, like **Life cycle**. Find your saved report and drag it into the collection, then click **Save**.
{% endstep %}
{% endstepper %}
Want a more advanced report? See [the most useful hidden GA4 report for ecommerce](https://blog.littledata.io/2024/12/03/modeled-attribution-ga4-which-channels-matter/).
#### 10. Create a custom report: Google Ads
GA4's standard reports don't make Google Ads data easy to find. Here's how to build a Google Ads report and add it to your menu.
{% stepper %}
{% step %}
**Open the Google Ads campaigns report**
In GA4, go to **Reports** > **Life cycle** > **Acquisition** > **Acquisition overview**. Scroll down and click **View Google Ads campaigns** on the Google Ads card.
{% endstep %}
{% step %}
**Customize the report**
Click the pencil icon (**Customize report**). Add the dimensions and metrics you need, like:
* Keyword
* Query
* Cost
* ROAS
* CPC
The charts at the top follow your default dimension and the metric you sort by. For example, set **Query** as the default dimension and sort the table by key events.
{% endstep %}
{% step %}
**Save and add it to a collection**
Click **Apply**, then **Save** > **Save as a new report**. Add it to a collection from the **Library**, the same way as in step 9.
{% endstep %}
{% endstepper %}
#### 11. Create a custom report: refunds by campaign
Littledata sends refunds to GA4 automatically. That means you can trace refunds back to the channels that drove the original purchases.
Adding refunds to the standard ecommerce report doesn't work well, so use an exploration instead. This trick turns any standard report into an exploration.
{% stepper %}
{% step %}
**Open Ecommerce purchases**
In GA4, go to **Reports** > **Life cycle** > **Monetization** > **Ecommerce purchases**.
{% endstep %}
{% step %}
**Open it as an exploration**
Click the **Edit comparisons** icon in the top-right corner, then click **Explore** at the bottom of the panel.
{% endstep %}
{% step %}
**Add refund data**
Add **Item refund amount** as a metric. Add **First user source / medium** and **First user campaign** as dimensions.
{% endstep %}
{% endstepper %}
Now you can compare how each channel performs once refunds are taken into account.
#### 12. What next?
It depends on your goals. You might want to:
* [Fix traffic from an unwanted country](https://help.littledata.io/google-analytics/behavior/fix-phantom-traffic-ga4)
* [Measure visits from AI tools](https://help.littledata.io/google-analytics/behavior/ga4-channel-ai-traffic)
* [See how your product pages perform](https://help.littledata.io/google-analytics/conversions/how-to-measure-shopify-product-conversion-rate-in-ga4)
Browse the help center for more guides on common GA4 challenges.
### Related articles
* [Custom dimensions for calculating customer lifetime value](https://help.littledata.io/google-analytics/conversions/customer-lifetime-value-google-analytics)
* [Tracking plans and event schemas](https://help.littledata.io/advanced/developer/what-does-littledata-track)
* [Refunds tracking in Shopify](https://help.littledata.io/google-analytics/conversions/track-refunds-shopify-ga4)
* [GA4 explorations: complete guide for ecommerce growth](https://help.littledata.io/google-analytics/behavior/ga4-explorations-complete-guide-for-ecommerce-growth)